vscode에서 수행되어야 할 디버그 순서는 아래와 같다
1. 컴파일러 or 인터프리터 실행
2. 어떤 코드를 실행할지 지정
3. 디버그
먼저 1번을 하기 위해 python 라이브러리 PLY(Python Lex Yacc)을 설치하고
간단하게 변수 대입, 사칙연산, print 딱 3가지만 구현해 보자.
1. Python 인터프리터 만들기
먼저 어휘분석&토큰화를 담당하는 lexer.py부터 구현
import ply.lex as lex

# 토큰 리스트 정의
tokens = (
    'NUMBER',
    'PLUS', 'MINUS', 'TIMES', 'DIVIDE',
    'LPAREN', 'RPAREN',
    'EQUALS',
    'PRINT',
    'NAME'
)

# 리터럴 정의
t_PLUS = r'\+'
t_MINUS = r'-'
t_TIMES = r'\*'
t_DIVIDE = r'/'
t_LPAREN = r'\('
t_RPAREN = r'\)'
t_EQUALS = r'='

# 키워드 정의
t_ignore = ' \t'

# 숫자 처리
def t_NUMBER(t):
    r'\d+'
    t.value = int(t.value)
    return t

# 변수 이름 처리
def t_NAME(t):
    r'[a-zA-Z_][a-zA-Z0-9_]*'
    if t.value == 'print':
        t.type = 'PRINT'
    return t

# 줄바꿈 처리
def t_newline(t):
    r'\n+'
    t.lexer.lineno += len(t.value)

# 에러 처리
def t_error(t):
    print(f"Illegal character '{t.value[0]}'")
    t.lexer.skip(1)

# 렉서 생성
lexer = lex.lex()
다음은 구문 분석기, parse.py 구현
import ply.yacc as yacc
from lexer import tokens
import sys

# 변수 저장용 딕셔너리
names = {}

# BNF 정의
def p_statement_assign(p):
    'statement : NAME EQUALS expression'
    names[p[1]] = p[3]

def p_statement_print(p):
    'statement : PRINT LPAREN NAME RPAREN'
    if p[3] in names:
        print(names[p[3]])
    else:
        print(f"Undefined name '{p[3]}'")

def p_statement_expr(p):
    'statement : expression'
    print(p[1])

def p_expression_binop(p):
    '''expression : expression PLUS expression
                  | expression MINUS expression
                  | expression TIMES expression
                  | expression DIVIDE expression'''
    if p[2] == '+':
        p[0] = p[1] + p[3]
    elif p[2] == '-':
        p[0] = p[1] - p[3]
    elif p[2] == '*':
        p[0] = p[1] * p[3]
    elif p[2] == '/':
        p[0] = p[1] / p[3]

def p_expression_number(p):
    'expression : NUMBER'
    p[0] = p[1]

def p_expression_name(p):
    'expression : NAME'
    if p[1] in names:
        p[0] = names[p[1]]
    else:
        print(f"Undefined name '{p[1]}'")
        p[0] = 0

def p_error(p):
    print("Syntax error at '%s'" % p.value)

# 파서 생성
parser = yacc.yacc(debug=False, write_tables=False)

def main():
    # sys.argv를 사용하여 파일 경로를 인자로 받음
    if len(sys.argv) < 2:
        print("Usage: python parser.py <filename>")
        sys.exit(1)

    # 파일 경로를 가져옴
    file_path = sys.argv[1]

    # 파일 읽기
    try:
        with open(file_path, 'r') as f:
            content = f.readlines()

        # 파일의 각 줄을 파싱
        for line in content:
            line = line.strip()  # 공백 제거
            if not line:
                continue
            parser.parse(line)
    except FileNotFoundError:
        print(f"File {file_path} not found.")
        sys.exit(1)

if __name__ == '__main__':
    main()
실행 방법은 python3 parser.py <filename>이다.
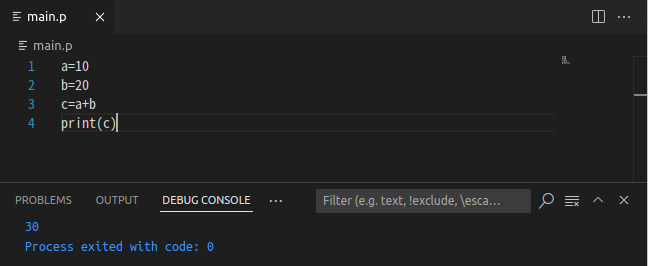
아래와 같이 test.p라는 파일이 있다고 가정하고,
a=10
b=20
c=a+b
print(c)
실행결과는 아래와 같다.

아래의 작성글 이후로는 pyinstaller를 이용하여 실행파일로 설정할 것이니,
pyinstaller 실행방법을 모르면 실행 프로그램을 python으로 실행하거나 pyinstaller에 대하여 습득하고 와야 한다.
본 글 이후로는 실행프로그램은 "parser"로 임의설정한다.
2. VSCode에서 인터프리터 실행
이전 글에서 program을 임의로 적었는데 이제 디버그가 실행될 때 실행되어야 할 프로그램은 인터프리터인 parser이다.
launch.json에서 program을 parser로 설정해 주고, 인터프리터 할 코드(text파일)는 현재 편집기에 열려있는 파일로 지정할 수 있도록 한다.
환경변수를 추가해도 좋지만, 나의 경우는 작동까지 확인 다하고 할 것이다.
{
    "version": "0.2.0",
    "configurations": [
      {
        "type": "p-debugger",
        "request": "launch",
        "name": "Launch P Program",
        "program": "/home/park/workspace/python_lex_yacc/dist/parser",
        "script": "${file}"
      }
    ]
}
이제 Extension을 손봐주자.
debugger가 시작될 때 실행되는 프로그램을 설정하하는 곳은 package.json에서 debugger - program이다.
아래와 같이 설정하면, debugger 시작 시 debugAdapter.js가 실행된다.
"contributes": {
		"languages": [
			{
				"id": "p",
				"aliases": [
					"P",
					"p"
				],
				"extensions": [
					".p"
				]
			}
		],
		"breakpoints": [
			{
				"language": "p"
			}
		],
		"debuggers": [
			{
				"type": "p-debugger",
				"label": "P Debugger",
				"program": "./out/debugAdapter.js",
				"runtime": "node",
				"languages": [
					"p"
				],
            }
        ...
        ]
    ....
}
debugAdapter에서는 Child Process로 응용프로그램을 실행하는데, 표준입출력으로 통신한다.
제일 중요한 부분은 디버거가 launchRequest 되었을 때, args.program(python 인터프리터 parser)를 실행하고 매개변수 args.script(코드 파일)을 넘긴다.
import * as cp from 'child_process';
import * as vscode from 'vscode';
import {
    DebugSession,
    InitializedEvent,
    OutputEvent,
    TerminatedEvent
} from 'vscode-debugadapter';
import { DebugProtocol } from 'vscode-debugprotocol';

// Simple DebugAdapter class
class MyDebugSession extends DebugSession {

    private interpreterProcess: cp.ChildProcess | undefined;

    public constructor() {
        super();

        // Send an initialized event to signal that the debugger is ready
        this.sendEvent(new InitializedEvent());
    }

    protected initializeRequest(response: DebugProtocol.InitializeResponse, args: DebugProtocol.InitializeRequestArguments): void {
        // Respond to the initialize request
        response.body = response.body || {};
        this.sendResponse(response);
    }

    protected launchRequest(response: DebugProtocol.LaunchResponse, args: DebugProtocol.LaunchRequestArguments): void {
        const interpreterPath = (args as any).program || 'python';
        const scriptPath = (args as any).script || '';

        this.interpreterProcess = cp.spawn(interpreterPath, [scriptPath]);

        this.interpreterProcess.stdout?.on('data', (data: Buffer) => {
            const message = data.toString();
            this.sendEvent(new OutputEvent(message, 'stdout'));
        });

        this.interpreterProcess.stderr?.on('data', (data: Buffer) => {
            const message = data.toString();
            this.sendEvent(new OutputEvent(message, 'stderr'));
        });

        // When the process exits, send a terminated event
        this.interpreterProcess.on('exit', (code: number) => {
            this.sendEvent(new OutputEvent(`Process exited with code: ${code}`, 'stdout'));
            this.sendEvent(new TerminatedEvent());
        });

        // Respond to the launch request
        this.sendResponse(response);

    }

    protected disconnectRequest(response: DebugProtocol.DisconnectResponse, args: DebugProtocol.DisconnectArguments): void {
        if (this.interpreterProcess) {
            this.interpreterProcess.kill();
            this.interpreterProcess = undefined;
        }
        this.sendResponse(response);
    }
}

// Run the debug session
DebugSession.run(MyDebugSession);
3. 실행결과
브레이크포인트가 걸리고 변수가 보이는 디버그가 실행되는 건 아니지만, 디버그 버튼으로 나의 코드가 수행되고 있다는 것은 확인할 수 있다.

댓글